Showing posts with label Room Makeover. Show all posts

Wednesday, September 23

Studio Makeover with Centered by Design / AFTER (+ a Giveaway!)


TA-DA! Today we're sharing the AFTER photos from our recent studio makeover. And, you guys, we are just so in love with our new space. Remember how the loft looked BEFORE? Pretty lackluster, right? But the oh so talented Claire Staszak, of Centered by Design, swept in and transformed the room from blah to this bohemian creative sanctuary! She worked with us to sort through a few design challenges and helped us think outside the proverbial box. Below, Claire shares some pro-tips on how to approach the daunting task of redesigning a room of your own (spoiler alert...there's an amazing Giveaway at the end so read all the way through)!


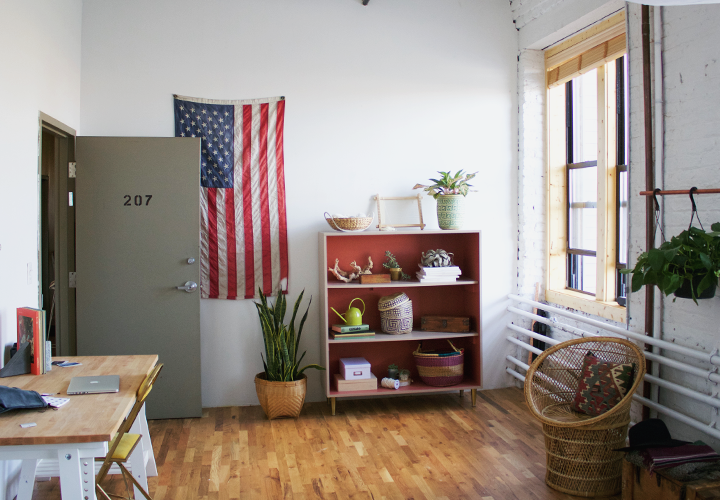

Hi guys! Claire here, again. I hope you like how the AFTER of our little studio re-desing turned out! I think we definitely took the beauty and function of this loft up a few notches. I'd love to fill you in on the design process.

First, it's important to see the design process as a problem solving process. Identifying the issues with your current space will give you direction, and a jumping off point, from which to start designing.

It is helpful to put parameters around the project to narrow down all the possible outcomes. Once you know the issues, then you can imagine and implement the design solutions. Coming up with the correct solution for the project or space can take some serious brainstorming, but that is when inspiration boards, Pinterest, magazines, etc...will come in handy. If you know the problem you are trying to solve, you'll be more apt to notice when you come across a possible solution!

Here's how I tackled the issues and parameters for the loft:


Parameter 1 / Keep the walls white. No paint! (Landlord's orders)

Design Solution: Add pops of color everywhere else! Use bright textiles, plants, painted furniture and colorful window frames to add necessary hue.

Parameter 2 / Anything hanging on the walls needs to be versatile and easily removable.

Design Solution: My favorite DIY project of the makeover! We constructed a dowel and leather rack to display Claire and Lauren's favorite rugs and blankets. They can swap out textiles depending on the season or their mood and it creates such a gorgeous focal point! And with minimal attachment to the wall, it's easy to take down or move. (Keep an eye out for the DIY coming to the blog soon!)


Parameter 3 / Establish a dedicated work area and a defined hang out space.

Design Solution: The studio is a fairly small room, long and narrow, so I had to get creative with the arrangement of furniture. I separated the desks from the hang out space and further created a "lounge feel" by adding a curtain and lantern above the sitting area. It completed the look and give the space its own identity.


Parameter 4 / Stick with a bohemian vibe (and stay within our (modest) budget).

Design solution: To play up a laid back boho vibe, I brought in vintage and artisan made textiles, unique accessories, and lush plants from two of my favorite local vendors, Territory Designs and Alapash New Home. Claire and Lauren decided that was where they wanted to spend the bulk of their budget, so we sourced vintage and inexpensive (ie. Ikea) furniture. Real life confession: That bookshelf was a totally dumpster find. We even found those amazing mid-century brass legs in the trash! So we enlisted the fabulous team at MegMade to do what they do best. They gave the bookshelf a little makeover with colorful paint and made it look brand new. Ps. The wicker love seat? An alley find as well!


We had a blast re-imagining this one room studio, and we'd love to help you get the look for your space too. So it's GIVEAWAY time! One lucky winner will receive an Artisan Made Pillow from Territory Designs and a Peruvian Alpaca Throw from Alapash New Home. PLUS, Centered by Design will personalize a mood board for a room re-design of your choosing. You'll get a 30 minute design consultation with Claire (via phone or Skype) and she'll round it out with suggestions for other pieces that will complete the look based on your personal style and the scale of your room. The "Get the Look" loop giveaway is hosted on Instagram only so head on over to @foxtailandmoss to enter to win. Good luck!

Monday, September 14

Studio Makeover with Centered by Design / BEFORE


Last year Claire and I decided to rent a studio. Blogging from our small two bedroom apartments was getting pretty cramped so we moved our little operation in to a one room loft space in a super industrial part of Chicago. Tall ceilings, exposed beams, huge windows, lots of sunlight and airiness. It was a studio space dream come true!

But we quickly realized we had totally underestimated just how tricky decorating a studio space can be. There are so many factors that play in to design choices! Because the function of the studio changes so often...photoshoots, meetings, a work space for DIY projects, a classroom for workshops...the space has to be versatile and furniture needs to be easily movable and multi-functional. Unobstructed wall space is a necessity for photoshoots, so we've never really been able to decided on permanent art or wall hangings. There's never enough storage for props and tools. And on top of that, we want the space to be inspiring, feel cozy, and reflect our aesthetic.

Enter our friend Claire Staszak. She's the talented lady behind Centered by Design. We've long admired her eye for decor and totally dig her bohemian leanings (and she also happens to be our yoga guru). We dumped our studio design woes into her knowledgeable lap and enlisted her to take our loft from boring and blah to oh so lovely. Take it away, Claire!


Hi! My name is Claire. Design and creativity have always played a role in my career. I have nearly a decade's worth of experience working as an event planner and marketer for innovative businesses, always teaching yoga and blending it into my work along the way. More recently, I was part of a team that transformed a dilapidated, 2,000-square-foot loft into a modern, creative oasis and event center complete with arts programming for Chicago’s largest visual arts center. Surrounded by the center’s many artists, designers, and craftspeople, this rewarding experience inspired me to further develop my own creativity and I have since been working passionately toward my degree in interior design.

I believe that taking the time to re-center ourselves and find a personal sanctuary is more important than ever in today’s fragmented and fast-paced world. My design philosophy blends my intuitive nature as a yoga instructor with my passion for interior design. I see on a daily basis how the connection between the body, mind, and our physical environment can have powerful influences on personal well-being. As a designer, my purpose is to make my client feel at ease during the design process and help her discover her own idea of sanctuary. Together we will design with intentionality to make a functional, beautiful, and above all, personal space.


I knew working with Lauren and Claire would be a bohemian match made in heaven! The design process began with a group meeting in their studio space. We talked about how we want the space to function, what elements are most important (i.e. deal breakers), and what, if anything, is off limits (budget or landlord restrictions). I had a good sense of their style (hello, love this blog!) but also wanted to learn what an "ideal studio sanctuary" meant to them.


We came up with a quick list of dos:
  • Plants!
  • Lots of light
  • Relaxed sitting area
  • Productive work space
  • Wall decor that can be easily transitioned
  • More storage
I took all the necessary measurements and we played around with some color scheme ideas. Next, it was time to really nail down a look and all the design elements. I chose a few inspirational images that represented the "feeling" of the look we're going for. Then I grabbed a few more images with design elements I felt would work in the space and offer solutions to a few of Lauren and Claire's design dilemmas. I tried to blend example photos with images of items the girls already owned and wanted to incorporate into the studio. Lastly, I created a floor plan to make sure everything actually fit in the space!

Not every initial suggestion is always the best fit, so we refined after a review process. But I think we stayed pretty true to the original vision and I can't wait for you to see the AFTER!


Stay tuned for the big reveal of our little studio's makeover. We are just so in love with the way it turned out! AND we have a super exciting GIVEAWAY in store that will get you motivated to do a room re-design of your own (complete with goodies from two of our favorite local home decor purveyors Alapash and Territory)!!! In the meantime, follow Claire on Instagram and Pinterest for more design inspo!

Monday, June 22

BEFORE // CLAIRE'S BEDROOM MAKEOVER


Were you inspired by Lauren's amazing bedroom makeover? I sure was! My bedroom has been on my makeover list for awhile. My husband and I have a decent size three bedroom apartment but our bedroom is pretty small, so we don't spend much time in there apart from sleeping. Because of that, I haven't worried too much about how it looks. It's always been a rotating random mess of hodgepodge items and decor. I'm finally ready to clear out and decide on exactly what look I want for the room. Instead of walking into the room every day and hating the way it looks, I'm excited to create a comfortable bedroom space that will help me relax and feel at peace!


Here are a few goals I have for the room:
• Paint the walls white to brighten the room. Our landlord painted before we moved in and I HATE the two shades of green she chose!
• DIY a wood headboard (like this one) for the bed.
• Night stands on both sides of the bed. The space is small so beside tables can be tricky. I found some inspiration here. Now to figure out if I DIY or buy.
• New window treatments and bedding.
• Pick out new artwork that compliments the neutral color pallet.
• Find mirror for above the dresser?

Have any ideas or suggestions for me? I always love to hear your creative ideas!
Also, please excuse these not so flattering few photos. With one window and not a lot of natural light, plus those ugly green wall (they MUST GO!), the room doesn't photograph so well.

{Claire}

Friday, May 15

AFTER // Lauren's Bedroom Makeover


Last month I started the process of giving my bedroom a makeover. It was high time for a couple of updates and a little freshening up. Today, I'm super excited to share 'After' photos of the space. It's amazing what a fresh coat of paint and changing a few small details can do!

The first thing we did was pull everything out of the room and repaint all the walls. From the looks of things, it had been years since those walls had received a fresh coat, certainly far before we moved in to the apartment. I decided on a slightly warm off-white because I just love white walls. They make a room look so fresh and clean. After much back and forth with the husband, we chose a deep charcoal as an accent wall for behind our bed. For a while now, I've been itching to paint a wall or two black. It took a little convincing on Matt's part, but we both absolutely adore how dramatic this dark dark charcoal turned out!


I love the vintage map that hung over our bed before but I was really ready for something a bit less bulky and way more organic looking. Inspired by a few of my favorite textile artists, I put together this wall hanging in just an afternoon. I love how the copper accents and textures pop against the dark wall. (PS- keep your eyes peeled for a DIY coming to the blog soon!) Because the dark wall and busy wall hanging are so eye catching, I decided to keep it simple with our bedding, plain white linens and a bright pink kilim pillow for an extra punch.


Our dresser is an Ikea hack that I copied directly from here. I love the gold accents and wanted to incorporate more gold and copper in to our bedroom, so I about died when I stumbled across a little vintage gold trunk. Not only is the perfect size for a bed side table, but the added storage is a life saver in our teeny tiny room. I think my favorite element in the room is the Norman Leigh mirror hanging above the dresser. It was my "big splurge" for the makeover but, I mean, how could I not get it!?

FOXTAIL + MOSS

I'm so happy with the way things are looking in our new bedroom. The space feels calmer and more intentional, a bit more luxe and grown up. But just like the rest of our apartment, the space is a constant work in progress. Next up is finding a little rug to go between the bed and dresser to make the room that much more cozy. Any suggestions? What do you think of the makeover? I'd love to hear from you! And don't forget to check out the source list for the room below. Xx. Lauren


Sources: Wall Hanging: DIY / Triangle Mirror: Norman Leigh Design from Humboldt House / 'You, Yes You' Print: People I've Loved from Have Company / Laundry Basket: Nate Berkus for Target / Gold Chest Nightstand: Vintage / Hanging Copper Light: West Elm (cut glass bulb from CB2) / Kilim Pillow: Lost Girls Vintage / Wall Color: Crisp White Linen and Deep Onyx by Glidden

Monday, April 13

BEFORE // Lauren's Bedroom Makeover


Hey guys! We're starting off this Monday with a little peek at my bedroom. I was super inspired by Claire's oh-so-lovely living room make over and decided that my boudoir was in needed of a bit of freshening up. It's the room where we spend the bulk of our time but somehow it was neglected when it came to designing and decorating the rest of our apartment. Most of the elements in the room are an after thought and I'm ready for the room to feel a bit more intentional and "grown up".


I love that our bedroom gets ton of natural sunlight but it's a pretty tiny space, only about 8 feet by 10 feet or so. There's barely enough room to fit our bed and dresser in there comfortably but I like to think of it as cozy. ;)  I've tried rearranging the room about a million different times but it's current layout seems to work best. I'm happy with the furniture we currently have, it's functional and pretty enough. So I'm looking to update the room by refreshing the paint, updating the bedding, organizing, decluttering, and rethinking the overall vibe of the room.

What do you think? Should I bring in more color? Ditch the vintage school map hanging above our bed? Play with textures in textiles? It was so fun to read your suggestions and tips for Claire's living room make over, so lay them on me! I can't wait to get started redecorating and share the final reveal with you later this month!

{Lauren}

Monday, March 9

AFTER // Claire's Living Room Makeover


Back in January I started a Living Room Makeover. Almost two months later and it's finally complete! There were a few things that held up the project, but I'm so happy with how everything turned out. I purchased a couple new items, created a few DIY pieces, built a piece of furniture (yes!), and did some rearranging to make the room meet all the goals I set out to accomplish.


One of my main goals - DECLUTTER! I got rid of some underutilized furniture, gave a lot of my little plants to friends, and picked out some light colored accessories that make the room feel lighter and a bit larger. Curating the room and paying attention to small details gives the space a more cohesive and polished look.


Getting rid of the shelf that held all our DVDs instantly made the room feel less cluttered and less overwhelming to me. I swapped the shelf out for a table I picked up in Michigan a couple of years ago. It holds my knick knacks and vintage radio perfectly. Originally I was thinking of putting a circular side table in that space, but once I put the rectangular table against the wall, I ended up really liking the way it looked. Eventually, I might make a piece of furniture that better matches my new TV stand, but for now, this works.


I moved the amber lamp to another room and purchased a floor lamp. At first I was worried about not having a side table between the couch and chair, but I'm not missing it at all and am glad the space is less crammed with furniture. I picked up some new couch cushions from West Elm, grabbed some lovely new ceramics from Gather Home + Lifestyle, purchased new curtains from IKEA and had the biggest Craigslist score of my life (thanks Ali!) with a light colored rug that I absolutely love. I moved our wall hanging that was above the couch to a space that works better with it's vertical layout. My husband is working on a painting for above our couch so in the interim, I created an inexpensive temporary piece of art. All these little improvements have a huge effect on the room.


What I struggled with the most was a TV stand. I looked all over and couldn't find one that was both in my budget and fit the space. My solution...IKEA hack! This credenza brings the TV higher off the ground, holds all our DVD's, and hides miscellaneous items. Also, it feels totally awesome to have built a piece of furniture! It definitely gave me the courage and confidence to build more pieces for my home.


Thanks everyone for the great makeover suggestions. I hope this inspires you all to tackle any redecorating projects you have in the future. We'll continue our home makeovers next month so stay tuned!

{Claire}